Recommended test
Generate one rectangular hip roof, inspect its eaves and live controls, then compare a square pyramid.
- In an updated CAD build, open Build and choose Hip roof. Use a 3000 by 4800 mm footprint, 2400 mm wall height, 28-degree pitch and 250 mm overhang.
- Enable roof sheathing, both batten layers, simplified covering, fascia, eaves flashing and gutters. Add Simple Panel siding and corner posts, then Generate.
- Inspect all four roof faces, eight equal-length corner boards and the two downpipes. Hide the covering and caps briefly to inspect the flashing above the battens.
- Open Live Control. Try tile thickness and vertical offset, change a Simple Panel wall pattern, then adjust Downpipe and use Reset.
- Save and reopen the .strek project, confirm the live settings, then use a separate test model with a 4000 by 4000 mm footprint to inspect its central apex.
Availability: Released on 13 September 2026. Hip roof V1 is available in the live Autostrek CAD app. Open Build, then choose Hip roof under Roof type.
What a hip roof creates
A hip roof slopes down on all four sides, with level eaves around the building. Rectangular buildings have a ridge along the longer side. Square buildings form a pyramid with a central apex. Changing which building dimension is longer changes the ridge direction automatically.
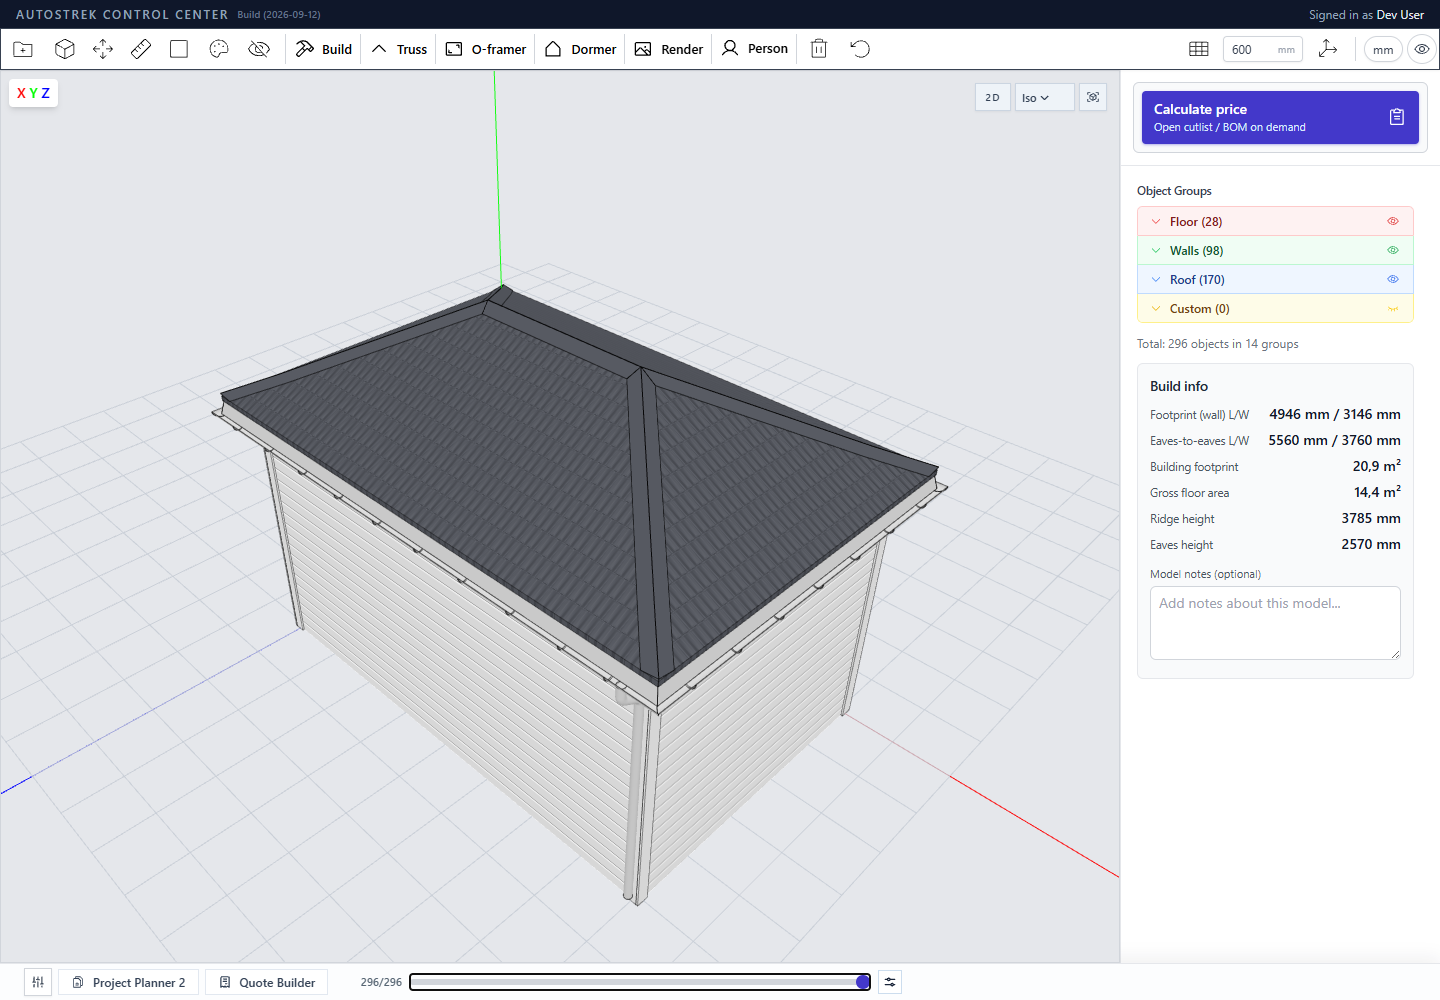
V1 supports rectangular and square footprints within Build Generator’s existing size limits, up to 12 m wide by 18 m long. All four faces share one pitch and the same horizontal overhang. The pitch must be above zero and no more than 65 degrees; overhang can be 0 to 600 mm. Changing only the overhang preserves the ridge height.
Generate your first hip roof
- Open Build and set the structure’s width, length and wall height. For a first example, use 3000 by 4800 mm with 2400 mm walls. Enter equivalent values if your display unit differs.
- Under Roof type, select Hip roof.
- Set Roof pitch (degrees) to 28 and Overhang on all sides to 250 mm.
- Enter Rafter width and Rafter depth. The building spacing controls common and jack rafter spacing; it must be at least as wide as a rafter.
- Choose roof layers and accessories using the options below. Enable Timeline recording if you want to inspect the generated construction sequence.
- Choose Generate. Inspect the roof from above and from each corner. This rectangular example has four sloping faces and a short ridge; a 4000 by 4000 mm example has an apex.
The hip framing system generates common rafters, shorter jack rafters, four diagonal hip rafters and a ridge board where a ridge exists. Hip rafter depth is calculated to align its shaped top with the roof faces and wall bearings. Gable framing choices and saved truss definitions do not apply to this roof type. Member dimensions describe geometry; Autostrek does not calculate structural load capacity.
Choose the roof layers
- Roof sheathing
- OSB, plywood or custom panels cut to the four roof faces. Set sheet length, width and thickness; custom sheathing also has a material name. Choose None to omit it.
- Counter-battens
- The supporting batten layer running up the roof slopes.
- Tile battens
- Battens across the slopes, with a Tile batten spacing input.
- Roof covering and hip/ridge caps
- Covering on all four faces, caps along the four hips and a ridge cap where a ridge exists.
- Fascia on all four sides
- Level fascia around the full eave perimeter. Hip roofs have no gable bargeboards.
- Eaves flashing
- Folded flashing above the enabled supporting layers, with an angled lip toward the gutter.
- Gutters on all four sides
- A perimeter gutter system with hooks and two downpipe runs at opposite corners.
Hip roof layer toggles are independent. For a complete tiled example, explicitly enable sheathing, counter-battens, tile battens and covering. Start with fewer layers when inspecting framing, and use Generate again after changing the stack.
Simplified covering is the efficient option, with Wave, Flat or Standing seam appearance. Individual flat tiles creates separate tile courses clipped at the hips. Set tile length, width, overlap and whether to stagger the rows. Detailed mode uses more geometry; its tiles remain physically flat even if a live surface pattern is changed to Wave or Standing seam.
Automatic eave and corner details
Projecting common, jack and hip rafter tails use a 70 mm vertical end face with a horizontal return cut to keep deeper rafters behind the fascia. The return stops at the wall bearing when needed. Zero-overhang rafters retain their bearing cuts, and naturally shallower tips are not thickened to 70 mm. This is an automatic detail, with no separate plumb-cut control.
Eaves flashing sits on top of the enabled batten stack and below the roofing. Without battens it follows the sheathing, or the framing if sheathing is also omitted. The fold clears the fascia, the angled drip lip extends into the gutter, and the four flashing runs meet at mitred corners.
With flashing enabled, the covering projects 10 mm horizontally beyond the upper flashing fold, where the flashing starts turning down. That measurement is from the upper fold, not the lower drip lip inside the gutter. It applies to simplified covering and individual flat tiles. This extra covering projection does not change the structural overhang setting.
The diagonal hip-cap tips extend 5 mm past each adjoining tile edge at all four corners, including when eaves flashing is disabled. These projections are generated automatically. Hide the covering and caps temporarily to see the flashing, then show them again to inspect the finished edge.
Finish the walls and drainage
Enable Wall Siding to cover all four walls, including the two end walls. Both Simple Panel and Boards siding are supported. Hip wall tops stay level. Optional wall sheathing and battens can be included in the wall assembly.
Enable Corner posts for eight corner boards: two per wall, making a pair at each corner. All eight have equal lengths and square-cut tops under a hip roof.
The two downpipes run down opposite corners, centred on the relevant corner-post board with 10 mm clearance from its face in the generated position. Their placement follows the wall finish when wall layers change. Without corner boards, they use the available wall finish near the corners. The pipes have continuous rounded bends, and nearby gutter hooks automatically clear the outlets.
Adjust the generated roof with Live Control
Open Live Control using the sliders button at the bottom left of the workspace, then select Roof Control. Generate the covering or gutters first so there are parts for the relevant controls to adjust.
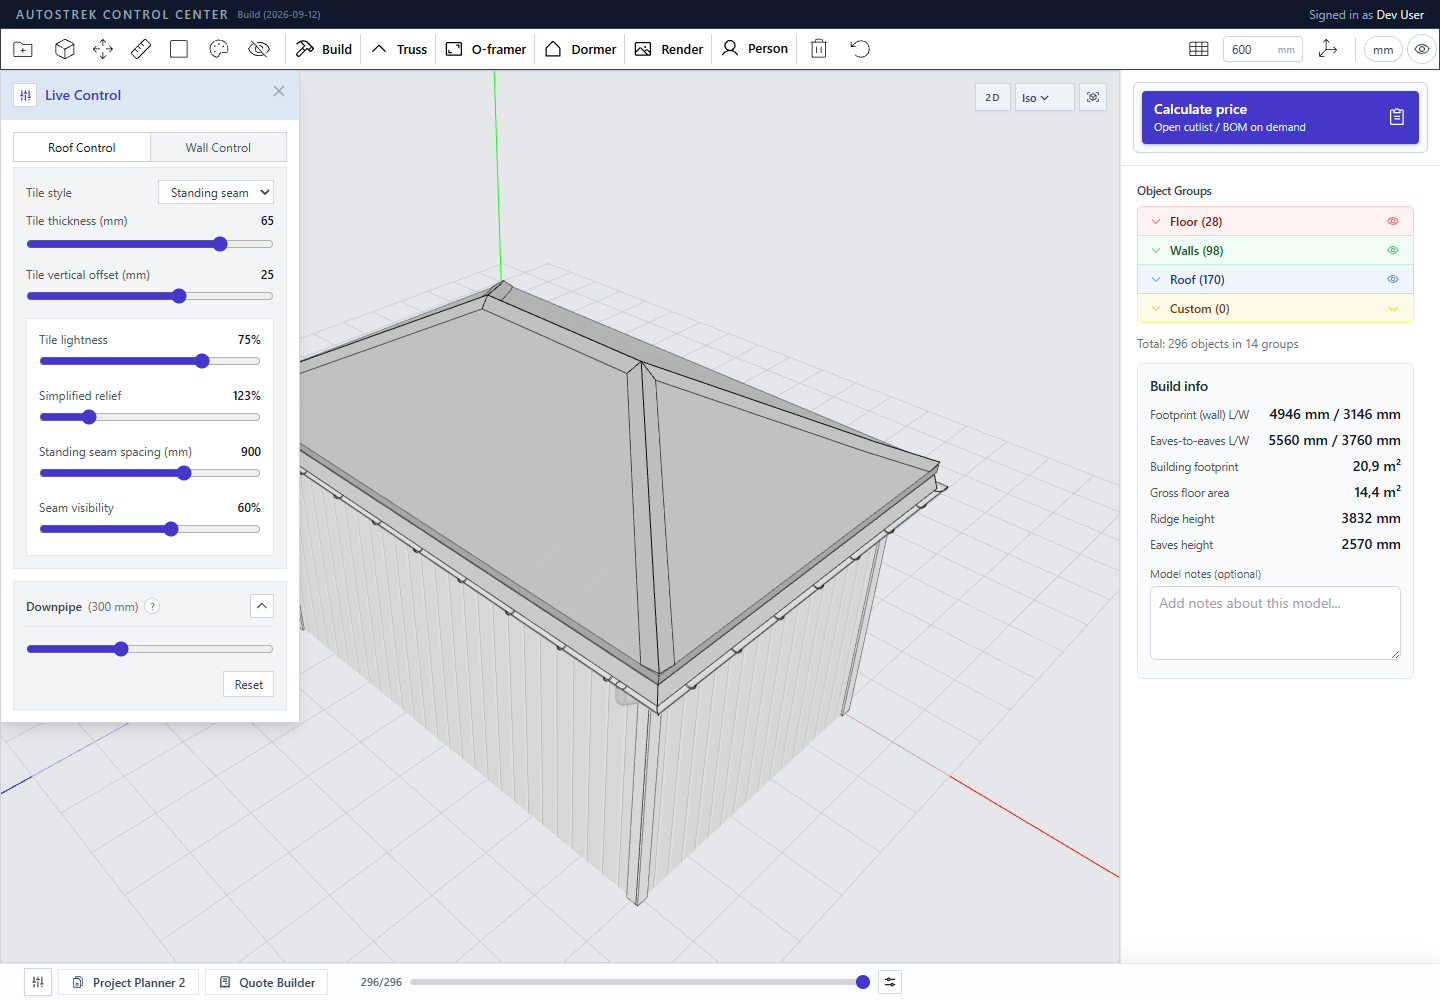
- Tile style
- Changes the Flat, Wave or Standing seam surface pattern. Detailed tiles keep their flat-tile course geometry.
- Tile thickness (mm)
- Changes covering thickness; the hip and ridge caps adjust to fit.
- Tile vertical offset (mm)
- Raises or lowers the covering and caps together. Supporting layers, flashing and gutters keep their positions. Inspect clearance after lowering the roof covering.
- Tile lightness
- Adjusts simplified covering brightness.
- Simplified relief
- Adjusts the visible relief of the simplified pattern.
- Seam visibility
- Adjusts seam contrast on simplified covering.
- Standing seam spacing (mm)
- Adjusts the simplified Standing seam pattern when that style is selected.
- Downpipe
- Adjusts the straight inclined section between the bends on both pipes. The gutter connections and hooks stay fixed, and the vertical runs remain aligned with the corner-board centres along the wall.
Lightness, simplified relief and seam controls appear for simplified covering. Thickness, vertical offset and surface style also work with individual flat tiles. Choose covering detail and the enabled roof layers in Build, then regenerate to change them. Hip roofs do not use the Outer Bargeboard controls.
Expand Downpipe to use its slider. A manual adjustment can change the gap between the pipe and the wall. Reset restores the generated position with the automatic 10 mm corner-board clearance.
Switch to Wall Control to change Simple Panel siding on all four walls: Horizontal, Shiplap, Vertical or Smooth pattern; board width; siding visibility; and extra contrast lines with adjustable opacity. These controls apply to simple panels, not individual Boards siding. See live siding controls.
Save, regenerate and inspect
Save the model as a .strek project to keep the geometry and supported live settings. Reopening the file restores the controls for newly generated Hip roofs. A generator preset saves the inputs for another build; save the project separately to retain the actual model and later edits.
Changes to footprint, pitch, overhang, framing, roof layers or covering detail require Generate again. Save a project checkpoint before replacing a building that contains manual edits. Live thickness, offset, pattern and downpipe adjustments can be made without regenerating the whole structure.
Hip parts use the normal selection, groups, visibility, Build Timeline and cutlist workflows. Live adjustments retain the parts’ grouping and timeline membership, including hidden or moved parts. For inspection, move the timeline to the complete building and use object visibility to reveal the relevant layers.
Troubleshooting and V1 limits
- Hip roof is missing from Roof type: save your work and refresh the live CAD app to load the released version. Open Build again and check the Roof type selector.
- Live controls do not affect an older Hip model: save a copy, then regenerate the Hip building once in the updated build. Earlier saved geometry is not automatically upgraded with live-control support. Regeneration also applies the current siding, corner-board, rafter-tail, flashing and drainage details.
- There is no ridge board on a square building: this is expected; the four roof faces meet at an apex.
- Generate reports invalid geometry or framing: check the building limits, use a positive pitch no higher than 65 degrees, keep overhang within 0 to 600 mm, and use valid rafter dimensions and spacing.
- A live control seems to do nothing: check that the relevant covering, gutter or Simple Panel siding was generated and is visible. Simplified appearance controls do not change detailed tile geometry.
V1 covers rectangular and square buildings with equal pitches, a uniform overhang and level eaves. L-shaped or other compound footprints, different pitches on individual faces, dormers on Hip roofs, and Hip-specific Create assembly guide instructions are outside this version. The ordinary model, timeline and cutlist workflows remain available. See current tool boundaries before choosing a dependent workflow.